- Connect to your router.
- Open your connection status> open details>look at your IPv4 Address. For example my IPV4 is 192.168.43.14 (see image). Please note yours somewhere.

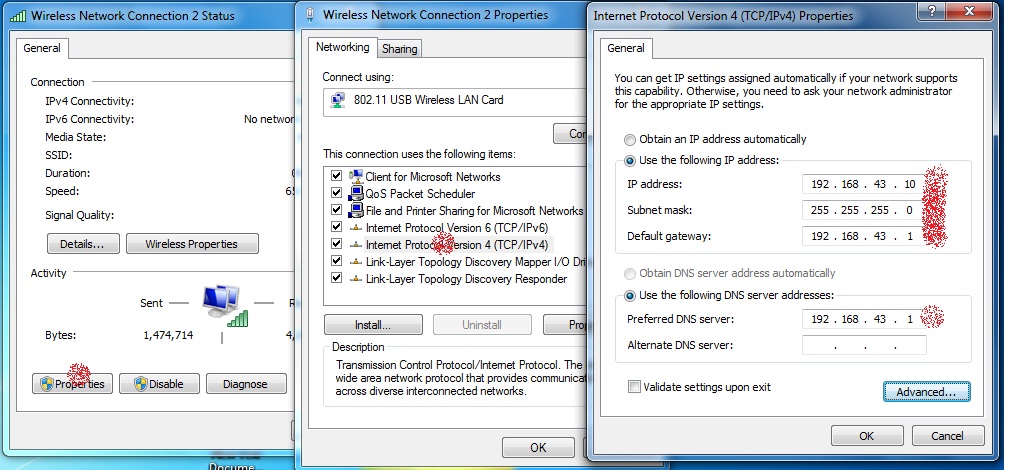
- Close the details. Go to properties(see image below) > go to the properties of TCP/IPv4> Select use the following IP address. Now take the IPv address you noted from details and remove the last digits and replace it with 10>press Tab(automatically enters 255.255 etc in subnet mask> press Tab again> in Default Gateway enter the same IP address only replace the last digits with 1. Now enter the same IP manually in DNS (see image)

- Click advanced

- Click Add> In IP Address enter the IP Address of your ROUTER only replace last digits with 10 (see image). My router has IP of 192.168.0.1, so I have entered 192.168.0.10.
Now save all the settings. If windows prompts for any error click Ok.
- This should work now. If not go to step 7.
- Windows has a strange problem. Very often when you have made these settings. Internet access and router access does not happen. This is because windows removes the IP from default gateway automatically. All you have to do is go to the properties of TCPIPv4 and enter the default gateway again.
- You are good to go now.


- Comment
- Reblog
-
Subscribe
Subscribed
Already have a WordPress.com account? Log in now.

Thanks you 🙂
LikeLike
It worked! Thank you sir!
LikeLike
These step above i ffollowed all but it is not working it says dhcp enable: no
LikeLike
Thanks Dear!
LikeLike
Thanks for this you have saved my life!!!!
LikeLike
wow this was simply great 🙂
LikeLike
What’s up friends, how is the whole thing, and what you wish for to say regarding
this piece of writing, in my view its in fact remarkable
in support of me.
LikeLiked by 1 person
Thanks in favor of sharing such a pleasant thought,
paragraph is nice, thats why i have read it entirely
LikeLiked by 1 person
Most welcome dear.
LikeLike
Genius, thank you!
LikeLike
It still says dhcp enable no
LikeLike
Oh thank you so much, you really helped me a lot!!!! Never thought that this would succeed 😀
I’m free from resetting!!
LikeLike
Thank you verry much, i was so close on factory resetting my router good thing i found this
LikeLike
Great !! Absolutely useful information and Thank You!! ,It really Worked , and i as a last step to the above instructions,
Do not forget to revert the property settings to Automatic IP obtaining once you have changed your router configuration and enabled DHCP back.
LikeLike
Your guidance really helped me
thanks a lot😊
LikeLike